> For the complete documentation index, see [llms.txt](https://helpdesk4.getfly.vn/huong-dan-su-dung/llms.txt). Markdown versions of documentation pages are available by appending `.md` to page URLs; this page is available as [Markdown](https://helpdesk4.getfly.vn/huong-dan-su-dung/doi-tac-ket-noi/zoom.md).

# Zoom

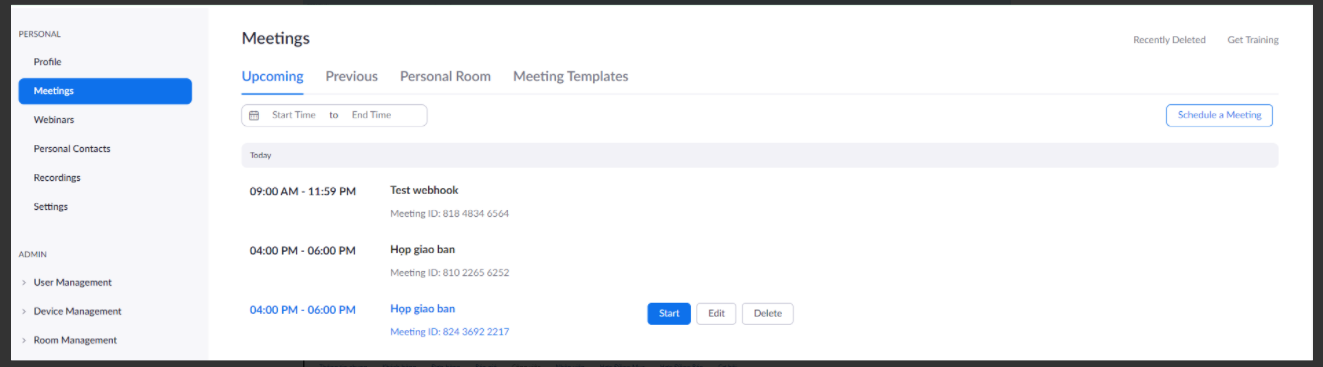
Khi tạo công việc có loại công việc là Meeting Online Zoom tự động tạo meeting\
theo thông tin công việc và cập nhật vào nội dung.

### 1. Build App

Bước 1: Truy cập <https://marketplace.zoom.us/> và đăng nhập tài khoản Zoom

Bước 2: Chọn Develop ⇒ Build App<br>

<figure><img src="https://1.getfly.vn/uploads?pt=714b63586a6c75376f46564178435157675876726e4861547a68795a65734e4b6f684166576f5165516a44317064494c5058792b4244452f42445a4255322f77" alt=""><figcaption></figcaption></figure>

\
\
Bước 3: Click create tại ô Server-To-Server OAuth<br>

<figure><img src="https://1.getfly.vn/uploads?pt=714b63586a6c75376f46564178435157675876726e4861547a68795a65734e4b6f684166576f5165516a42586f3377705a5778584e424f53792f467836746e786e464f4c436e776e73687179786944774a644e4759673d3d" alt=""><figcaption></figcaption></figure>

\
\
Bước 4: Nhập tên app và ấn Create

Bước 5: Tab App credentials\ <br>

<figure><img src="https://1.getfly.vn/uploads?pt=714b63586a6c75376f46564178435157675876726e4861547a68795a65734e4b6f684166576f5165516a446f764e62534f5746784f31634d71547643657362586e464f4c436e776e73687179786944774a644e4759673d3d" alt=""><figcaption></figcaption></figure>

\
\
Tại đây sẽ lấy được Account Id, Client Id và Client Secret, sử dụng để tích hợp vào CRM

Bước 6: Nhập thông tin app tại tab Information

<figure><img src="https://1.getfly.vn/uploads?pt=714b63586a6c75376f46564178435157675876726e4861547a68795a65734e4b6f684166576f5165516a426949315257634e4e67764e4a4a616d4672503056396e464f4c436e776e73687179786944774a644e4759673d3d" alt=""><figcaption></figcaption></figure>

\
Bước 7: Lấy Secret token

<figure><img src="https://1.getfly.vn/uploads?pt=714b63586a6c75376f46564178435157675876726e4861547a68795a65734e4b6f684166576f5165516a4267576554506c2f41724a70523130376f3246312b416e464f4c436e776e73687179786944774a644e4759673d3d" alt=""><figcaption></figcaption></figure>

\
Bước 8: Thiết lập webhook tại tab Feature

![](https://1.getfly.vn/uploads?pt=714b63586a6c75376f46564178435157675876726e4861547a68795a65734e4b6f684166576f5165516a4144452b77656850566c37724a6c784e567856334e2f6e464f4c436e776e73687179786944774a644e4759673d3d)

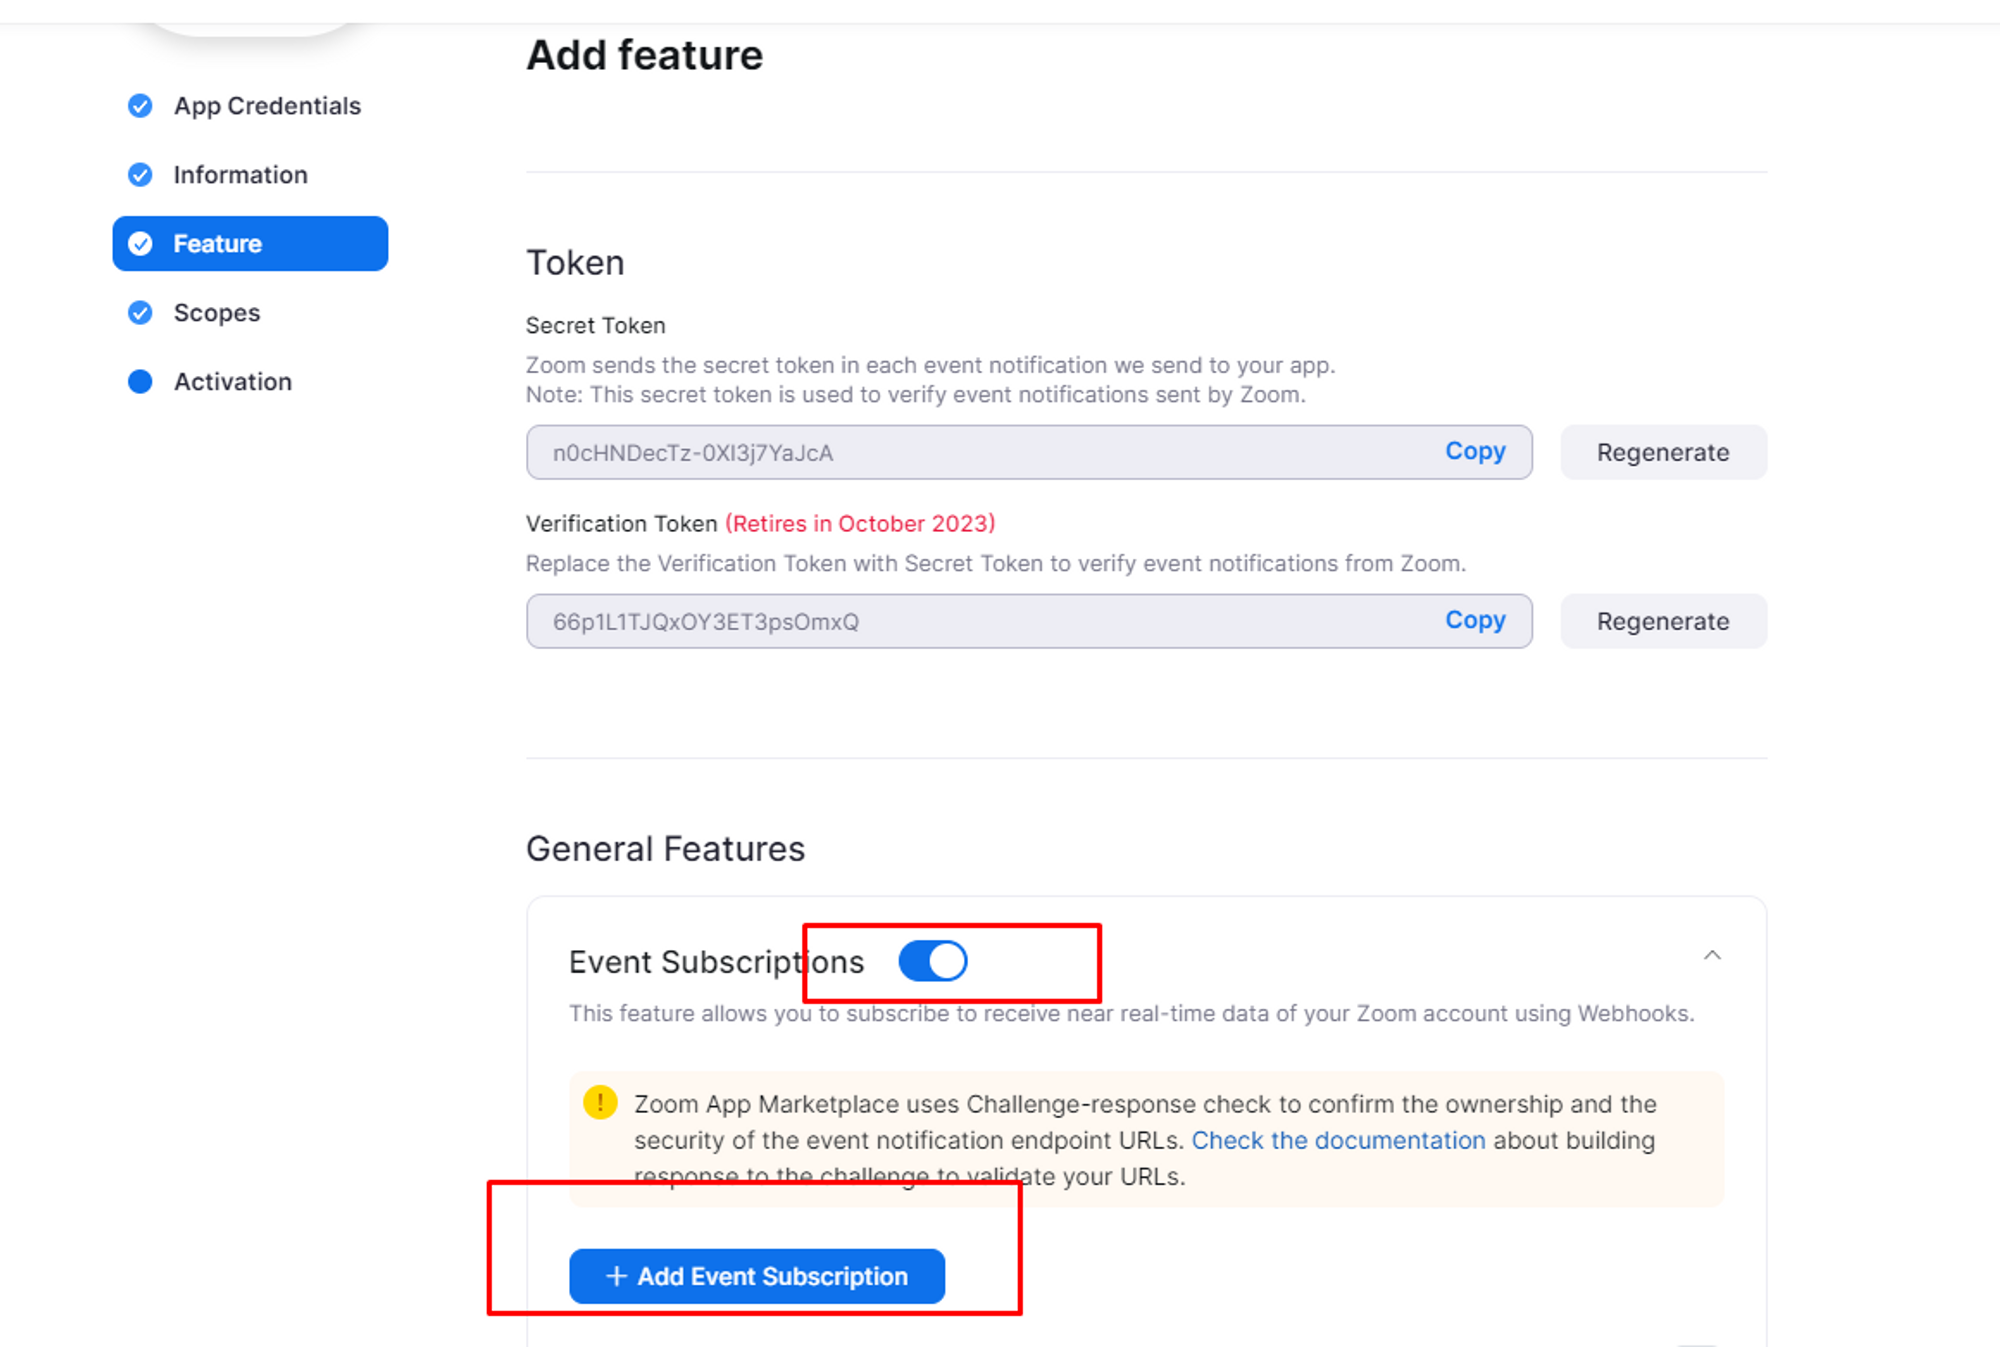
* Phần Endpoint có cấu trúc: https\://{{domain}}/webhook/zoom (domain là domain CRM)
* Click validate sau khi đã tích hợp trên CRM (Bên dưới)

![](https://1.getfly.vn/uploads?pt=714b63586a6c75376f46564178435157675876726e4861547a68795a65734e4b6f684166576f5165516a4265674c657978644b655575463436616d67733968676e464f4c436e776e73687179786944774a644e4759673d3d)

* Chọn Participant/Host joined meeting để gọi webhook khi Chủ phòng hoặc khách tham gia phòng họp
* <https://marketplace.zoom.us/docs/api-reference/zoom-api/events>

[​​​​​​​​​​​​​​](https://marketplace.zoom.us/docs/api-reference/zoom-api/events)Bước 9:  Thêm Scopes

<figure><img src="https://1.getfly.vn/uploads?pt=714b63586a6c75376f46564178435157675876726e4861547a68795a65734e4b6f684166576f5165516a44414d4170674e502b53473663532f722b55784a69676e464f4c436e776e73687179786944774a644e4759673d3d" alt=""><figcaption></figcaption></figure>

<figure><img src="https://1.getfly.vn/uploads?pt=714b63586a6c75376f46564178435157675876726e4861547a68795a65734e4b6f684166576f5165516a4475796531796133514d5939756d4f615937344d69626e464f4c436e776e73687179786944774a644e4759673d3d" alt=""><figcaption></figcaption></figure>

<figure><img src="https://1.getfly.vn/uploads?pt=714b63586a6c75376f46564178435157675876726e4861547a68795a65734e4b6f684166576f5165516a41426a595a434c2f2b71327259524149516853617641595676413257344c4c4473374b69754c2b4d636f71673d3d" alt=""><figcaption></figcaption></figure>

Bước 10: Kích hoạt app

<figure><img src="https://1.getfly.vn/uploads?pt=714b63586a6c75376f46564178435157675876726e4861547a68795a65734e4b6f684166576f5165516a42392b57627a504f7632616d726972716f2f6d6e425a43745271376d755372474651494c627a5659555244773d3d" alt=""><figcaption></figcaption></figure>

### 2. Tích hợp trên Getfly CRM

Bước 1: Lấy thông tin Account ID, Client ID, Client Secret và Secret token ở phần I để tích hợp\ <br>

<figure><img src="https://1.getfly.vn/uploads?pt=714b63586a6c75376f46564178435157675876726e4861547a68795a65734e4b6f684166576f5165516a42446b433736556e47662b4755566a706a315971544d43745271376d755372474651494c627a5659555244773d3d" alt=""><figcaption></figcaption></figure>

\
\
Bước 2: Tích hợp thành công, khi tạo công việc với loại công việc là Meeting Online Zoom, hệ thống sẽ tự động tạo 1 phòng họp Zoom dự theo tên, thời gian bắt đầu và kết thúc của công việc. Sau đó hiển thị thông tin phòng họp trong chi tiết công việc.\ <br>

<figure><img src="https://1.getfly.vn/uploads?pt=714b63586a6c75376f46564178435157675876726e4861547a68795a65734e4b6f684166576f5165516a435a434949326239476b734964534b51792f4d75643843745271376d755372474651494c627a5659555244773d3d" alt=""><figcaption></figcaption></figure>

* Phần nhận Lead, khi tick chọn sẽ tạo khách hàng từ webhook đổ về (Người có quyền thay đổi công việc sẽ có thể tick hoặc bỏ tick). Trường hợp thông tin từ webhook đổ về không có email thì sẽ không tạo khách hàng.
* Khi nhận Lead có thể chọn chiến dịch để đổ về cơ hôi (Những chiến dịch người dùng nhìn thấy).
* Các auto thêm mới khách hàng + cơ hội vẫn chạy bình thường.

Để có thể nhận được email của khách khi khách tham gia phòng họp thì tài khoản phải là Business, Education hoặc Enterprise.\ <br>

<figure><img src="https://wiki.getfly.vn/public/img/images/wiki/Screenshot_424.png" alt=""><figcaption></figcaption></figure>

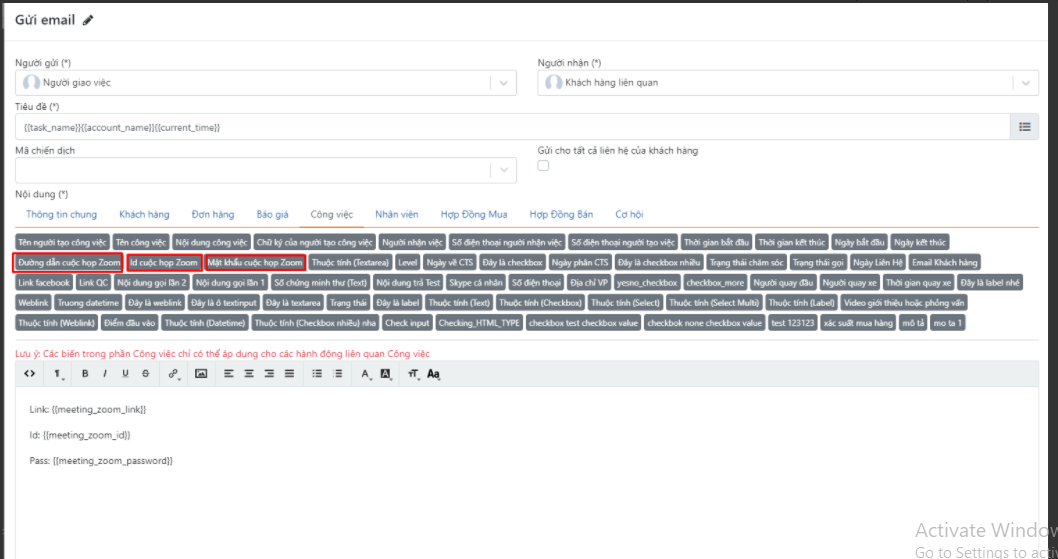
Bước 3: Bổ sung biến trong automation để có thể gửi cho khách hàng\
\
Lưu ý khi sử dụng automation trong trường hợp này:

\- Tạo công việc có loại cv là meeting zoom online -> thì mới tạo phòng zoom

\- Tích chọn Nhận lead -> khách hàng vào phòng zoom -> thì mới tạo KH đổ về hệ thống

\- Trường hợp auto gửi mail cho khách hàng sẽ áp dụng cho trường hợp gửi cho người nhận việc, KH liên quan (KH đã tồn tại trên hệ thống) người tham gia, nhân viên trong công ty,.. còn đối với khách sinh ra khi tích chọn lead đổ về khi tạo phòng zoom không áp dụng, do khi tạo công việc chưa có khách sinh ra.\
\ <br>

<figure><img src="https://wiki.getfly.vn/public/img/images/wiki/Screenshot_426.png" alt=""><figcaption></figcaption></figure>

<br>

<figure><img src="https://wiki.getfly.vn/public/img/images/h/Screenshot_427.png" alt=""><figcaption></figcaption></figure>


---

# Agent Instructions
This documentation is published with GitBook. GitBook is the documentation platform designed so that both humans and AI agents can read, navigate, and reason over technical content effectively. Learn more at gitbook.com.

## Querying This Documentation
If you need additional information that is not directly available in this page, you can query the documentation dynamically by asking a question.

Perform an HTTP GET request on the current page URL with the `ask` query parameter:

```
GET https://helpdesk4.getfly.vn/huong-dan-su-dung/doi-tac-ket-noi/zoom.md?ask=<question>
```

The question should be specific, self-contained, and written in natural language.
The response will contain a direct answer to the question and relevant excerpts and sources from the documentation.

Use this mechanism when the answer is not explicitly present in the current page, you need clarification or additional context, or you want to retrieve related documentation sections.
